XPath Builder
Overview and Objectives
In order to locate the HTML elements which are mapped by page nodes on a website,
wdio-workflo requires you to pass XPath selectors to the constructors of page nodes
and to the factory methods of a PageNodeStore which create instances of these page nodes.X
To quote w3schools.com, XPath uses "path" like syntax to identify and navigate nodes in an XML document. Wait - an XML document?
Aren't websites written in HTML? Well, XML and HTML work in a similar way - they are
both markup languages
which means that they use markup tags (e.g. <p>, <div>, ...) to describe the structure
of some data (in the case of XML) or of a website (in the case of HTML).
Therefore, XPath works with both XML and HTML.
The syntax used by XPath to locate nodes in an HTML file can become quite complex if you need to select a node buried deep within the structure of a website. For this reason, wdio-workflo ships with an XPath builder that allows you to create XPath expressions using a set of predefined builder functions, so that you don't have to remember all the syntax rules and to avoid errors in your XPath selectors.
However, wdio-workflo still allows you to write XPath expressions as "raw XPath strings". You can find more information about the syntax of XPath in this w3schools tutorial.
Please be aware that wdio-workflo only supports XPath selectors and no CSS selectors because XPath selectors are more "flexible" than CSS selectors (eg. they support searching for a parent element) and because the performance differences between the two are negligible in most cases.
Basic XPath Syntax
Although wdio-workflo's XPath builder spares you the need to know about each little detail of the XPath syntax, it's still useful to know some basic syntax expressions if you need to debug errors in your tests by examining the XPath selectors of page nodes.
Child Nodes
Let's start with the concept of direct and indirect child nodes. Direct child nodes are nodes that sit directly (one level) below their parent element in the structure of a markup document. Indirect child nodes are nodes that appear within the content of a parent element on any level of nesting.
Direct Child Nodes
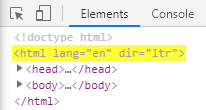
XPath will always start its search for an HTML node at the root of the DOM.
Usually, the DOM root has only one direct child: the html node.
In XPath, direct child nodes can be selected using a slash / followed by the tag name
of the child node, e.g. html. So, to select the <html> tag of a website,
you can write the XPath expression /html.
To try this, you open the developer tools of your browser (for Google Chrome, by pressing F12),switch to the "Elements" tab, press Ctrl + F to open the DOM searchbar and enter /html.
The first HTML node matching the entered XPath expression in the website's DOM will be highlighted:
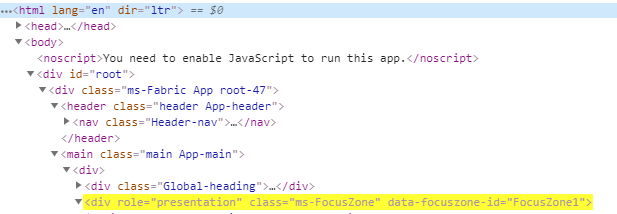
Indirect Child Nodes
Indirect child nodes are selected using a double-slash // followed by the tag
name of the child node, e.g. div. So, the XPath expression //div would select
all <div> tags of a website (but only the first match will be highlighted):

Concatenating Parent and Child Node Selectors
XPath allows you to concatenate the selector of a parent container and the selector of
any child node that sits inside this parent container - a concept that wdio-workflo
makes use of if you call a PageNodeStore factory method via the $ accessor
of a PageElement or PageElementList:
import { stores } from '?/page_objects';
import { Page, IPageOpts } from './Page';

export abstract class BasePage<
  Store extends stores.PageNodeStore
> extends Page<Store> {

  get container() {
    return this._store.Element(
      xpath('//main'),
    );
  }

  get heading() {
    return this.container.$.Element(
      xpath('//h1')
    );
  }

  /*...*/
}
In the code example above, the heading element is a child node of the container
element - this is reflected by the fact that the Element() factory method for
heading is invoked via the $ store accessor of the container element.
Using the $ accessor prepends the XPath selector of container to the XPath
selector of heading. The combined XPath selector for our heading element
that is eventually used to locate its corresponding HTML element on the website
is "//main//h1".
Constraints
In our examples above, our search for an HTML node always started from the
DOM root element of a website. However, there are usually a lot of the same
HTML tags like <div> on a website. If we do not want to select the first
<div>, but a <div> buried deep within the structure of a website, we need
to place additional constraints within our XPath expression.
Constraints are defined by appending double square brackets [] to your XPath
expression. Inside these brackets, we can define additional conditions that
an HTML node needs to fulfil in order to be selected.
One very basic use case is to select the n-th element of a kind. This means that we want to select the n-th tag of a series of equal tags on the same nesting level. To achieve this, we can simply put a number between the square brackets. This number indicates the index of the corresponding page node on the same hierarchy level, starting at 1.
To select the second <div> tag within the same hierarchy level, we would write
//div[2]:
Other types of conditions for a constraint are explained in the following sections of this chapter.
Attributes
One of the most common ways to constrain XPath expressions is to define values of HTML attributes.
Each HTML node has a set of attributes, depending on the actual type
of the HTML node (e.g. <div> or <input>). Very common HTML attributes often
used to restrict XPath expressions are the id and the class attributes.
XPath allows us to define HTML attributes via the @ character. The @ character
needs to be placed inside a "restriction", which is depicted with square brackets [].
To set the value of the HTML attribute, we put a ="" behind the @ character
and write the desired value between the quotation mark "" characters.
So, if we wanted to select the HTML node <div id="root">, we would need to
write //div[@id="root"]:
Text Content
Another common way to constrain XPath expressions is to define the text contained within an HTML element.
We can refer to the text contained within an HTML element by using the dot . character.
The text content does not necessarily need to be located on the level directly below
the selected HTML tag - the . character will also include text nested multiple
levels below the selected HTML tag.
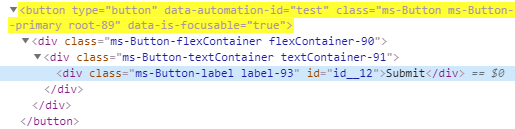
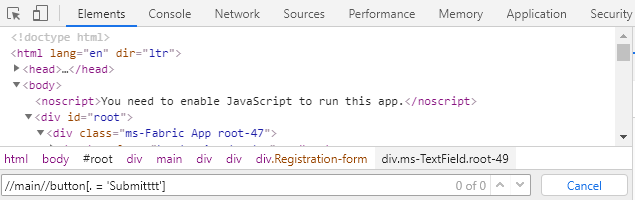
On the registration page of wdio-workflo's demo website, for example, there is
a button with the text "Submit". To select this button, we would need to write
//button[.="Submit"]. This would work, even though the text "Submit" is actually
located within a <div> tag 3 levels below the <button> element:
contains()
It is common to select an HTML node by constraining the value of its CSS class name. However, many HTML nodes do not have one, but many different CSS classes that all occur within their CSS class attribute.
In these cases, we can use XPath's contains() function which checks if a
string (e.g. the value of the HTML class attribute) contains a certain substring.
The class attribute of a <label> tag, for example, could have the value
"ms-Label ms-Dropdown-label label-80". We could select this label node
by checking if its class attribute contains the substring "ms-Dropdown-label"
by writing //label[contains(@class, "ms-Dropdown-label")]:

Multiple Constraints
We can also combine multiple constraints for a single HTML node by simply appending the constraints to the XPath expressions selecting the HTML node, each constraint surrounded by square brackets.
If we wanted to select a <div> HTML node, for example, whose id attribute
has the value "Dropdown10" and whose role attribute has the value "listbox",
we would write //div[@id="Dropdown10"][@role="listbox"]:

Has Child
Often you need to constrain the XPath expression for locating an HTML node by the attribute values of one of its child nodes. However, you want to select the parent HTML node and not the child node whose attributes or text is used to define the constraint.
You can refer to child nodes without selecting them by putting the XPath selector
of the child node within the constraint brackets of the parent node.
At the start of the child node's XPath selector, you can refer to the current node
by writing ..
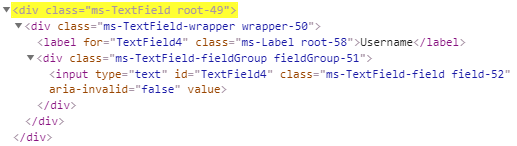
The registration page of wdio-workflo's demo website contains a couple of textfields.
Each textfield consists of a <label> and an <input> element and the textfield's
root element is marked by the CSS class "ms-TextField".
If we wanted to select the textfield whose label has the text "Username",
we'd write //div[contains(@class, "ms-TextField")][.//label[.="Username"]]:
Usage of XPath Builder
xpath Function
Wdio-workflo's XPath builder is available via the global xpath function.
This function takes the string of an XPath expression as parameter and returns
a builder object offering many different "XPath modification functions".
These XPath modification functions can be used to alter the original XPath
string.
Usually, you would only pass the tag name of the HTML element, prepended by either
/ if it is a direct child or // if it is an indirect child node of its parent node,
to the xpath function. So, for example, to select the first match of a <header>
HTML element, we would write xpath('//header').
XPath Modification Functions
We can then chain an arbitrary number of XPath modification functions to the
result of our xpath function. Most of these XPath modification functions
add constraints to the original XPath selector.
Constraint Functions
The most common constraint XPath modification functions are:
.id("myId").class("myCssClass").attribute("someHTMLAttribute", "valueOfTheAttribute").text("myText")
These constraint XPath modification functions also exist in a notXXX,
xxxContains and notXXXContains variant. So, for the id() function, there are:
notId("myId")to select nodes whose HTMLidattribute does not equal "myId"idContains("myId")to select nodes whoseidcontains the string "myId"notIdContains("myId")to select nodes whoseiddoes not contain the string "myId"
Some other constraint XPath modification functions are:
checked()to constrain HTML element to nodes which have an HTMLcheckedattributedisabled()to check if an HTML element is disabledindex(5)to constrain HTML elements by their index of occurrence across all levels of nestinglevelIndex(2)to constrain HTML elements by their index of occurrence within the some level of nestingname("myName")to constrain HTML elements by their HTMLnameattributeselectedto constrain HTML elements to nodes which have an HTMLselectedattributetype("myType")to constrain HTML elements by their HTMLtypeattribute
Finally, there is also a general constraint() function which takes two parameters:
- a constraint selector (the
constraintfunction will encapsulate this selector in square brackets) - an optional builder function to apply XPath modifications to the constraint selector
The following code example shows you how to use the general constraint() function:
xpath('//div').constraint(
  './/span', xpath => xpath.text('Some Text')
);
The result of the XPath from the above example would be //div[.//span[.="Some Text"]].
Please notice that the above constraint example can also be achieved using the
hasChild function described below.
hasChild
The hasChild function is very similar to the constraint function and can be
used to select a parent node which has a child node that matches a certain child selector.
It also takes two parameters:
- a selector of a child node
- an optional builder function to apply XPath modifications to the child selector
The only real difference from the above constraint code example is that hasChild
automatically adds a . to the beginning of the child selector, so that the
child selector always starts from the parent node as root:
xpath('//div').hasChild(
  '//span', xpath => xpath.text('Some Text')
);
The result of this hasChild example is exactly the same as the one of the
above constraint example: //div[.//span[.="Some Text"]].
append and child
The append function simply appends an arbitrary XPath expression to the builder's
current XPath expression:
xpath('//div').append('/a[@href="https://flohil.github.io/wdio-workflo/"]')
This code example results in the XPath expression //div/a[@href="https://flohil.github.io/wdio-workflo/"].
The child function is basically an alias for the append function.
They work in the exact same way:
xpath('//div').child('/a[@href="https://flohil.github.io/wdio-workflo/"]')
The only thing important to note for both append and child is that the
appended selector becomes the new target for XPath modification functions:
xpath('//div').child('/a[@href="https://flohil.github.io/wdio-workflo/"]').text('Click Me!')
So the above example results in the XPath expression //div/a[@href="https://flohil.github.io/wdio-workflo/"][.="Click Me!"].
Building and Resetting the Builder's XPath Expression
If you invoke the build() method on an XPath builder, the XPath expression
created by the builder will be returned as a string.
You can also clear the builder's current XPath expression by invoking the
builder's reset() method.
Usually, you don't have to call these two methods manually because the
factory methods of a PageNodeStore automatically invoke build() and reset().
Therefore, each factory method usually accepts an XPath expression either as a
normal string or as an instance of wdio-workflo's XPath builder.
However, if you want to store an XPath expression created by wdio-workflo's
XPath builder in a variable, you need to invoke build() yourself.
"Debugging" XPath Selectors
Sometimes your tests might fail because a page node could not be located using the given XPath selector. This can happen if the HTML structure of the tested web application has changed or if your XPath expression simply isn't correct.
Wdio-workflo usually displays the XPath selector of a page node in error messages:

You can then simply copy the XPath selector, open the developer tools of your browser,
switch to the Elements tab (in Google Chrome), press Ctrl + F to open the DOM
search field and paste the XPath selector into the search field to check if
the element can be located on the website:
Another way to obtain the XPath selector of a page node is to invoke the
getSelector() method of the PageElement, PageElementList and PageElementMap classes.
If I cannot obtain the XPath selector of a page node from an error message when debugging a broken testcase, I usually just output the page node's XPath selector to the console
using getSelector() and then copy it from there:
import { pages } from '?/page_objects';

console.log(pages.registration.submitButton.getSelector())
For more information about debugging in wdio-workflo, visit the Debugging Guide.