Steps
Objective and Overview
Steps represent interactions between a user and a system which usually cause the state of the tested application to change.
To modify or query the state of the GUI, steps access the page nodes defined within a
Page and invoke functions on them, e.g. a click on a PageElement.
Therefore, steps are an important link between testcases and page objects and they greatly improve reusability by encapsulating test logic in functions that can be invoked by any testcase.
Each step has a description written in natural language which is displayed in test reports. This allows stakeholders without a technical background to comprehend testcases.
Location and Naming Convention
Step files are located in the src/steps folder of your system test directory.
By convention, their filename always ends with .step.ts.
Examples
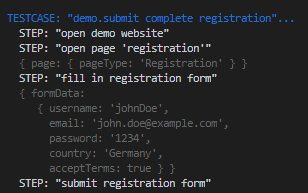
A very basic example of a Step can be found inside the file registration.step.ts
located in the src/steps folder of the wdio-workflo-example repository:
"submit registration form":
(params?: IOptStepParams<Workflo.EmptyObject, void>) =>
  new Step(params, (): void => {
    pages.registration.submitButton.click();
  }),
Implementing Steps
Step Definition Functions/Object
Steps are implemented within step definition functions. A step definition function takes a step parameter object and returns an instance of the Step class.
Related step definition functions are stored inside a step definitions object. The keys of this object are descriptions of the steps written in natural language and its values are the according step definition functions.
To make sure that your step definitions are correctly typed, pass your step
definitions object to wdio-workflo's defineSteps function. Have a look at the
file registration.step.ts located in the src/steps folder of your wdio-workflo-example
repository:
import { defineSteps, IOptStepParams, IStepParams, Step } from 'wdio-workflo';

import { pages } from '?/page_objects';

const registrationSteps = defineSteps({
  "fill in registration form":
  (params: IStepParams<{formData: pages.RegistrationFormData }, void>) =>
    new Step(params, ({ formData }): void => {
      pages.registration.form.setValue(formData);
    }),

  "submit registration form":
  (params?: IOptStepParams<Workflo.EmptyObject, void>) =>
    new Step(params, (): void => {
      pages.registration.submitButton.click();
    }),
});

export { registrationSteps };
The defineSteps function returns the exact same step definitions object which was
passed to it as parameter. Its only purpose is to ensure your step definitions are
correctly typed.
Step Parameters
Step Parameters Object and Step Arguments
A step definition function can take one parameter: a step parameters object. The step parameters object has two properties:
args=> An object to define arguments passed to aStepwhich can be mandatory or optionalcb=> The callback function of a step which is invoked immediately after the step's execution
If a Step has at least one mandatory step argument, its step definition function
always need to be passed a step parameters object. In this case, we need to use
IStepParams as the type of the step parameters object.
Otherwise, if a Step has no or only optional step arguments, the type of its steps parameter object is IOptStepParams. In this case, we should also put a ? after the params
entry of a step definition function's parameter list:
// the are mandatory step arguments - use `IStepParams` as the type of `params`
(params: IStepParams<{formData: pages.RegistrationFormData}, void>) =>
  new Step(params, ({ formData }): void => {
    pages.registration.form.setValue(formData);
  }),

// there are no mandatory step arguments - use `IOptStepParams` as the type of `params`
(params?: IOptStepParams<Workflo.EmptyObject, void>) =>
  new Step(params, (): void => {
    pages.registration.submitButton.click();
  }),
Both IStepParams and IOptStepParams take two type parameters:
- The type of the step arguments object
- The return type of a step's
executefunction
In the example above, the first Step has one mandatory step argument, formData,
which is used to fill in the registration form of wdio-workflo's demo website.
The second Step does not have any step argument. In this case, we can should
wdio-workflo's Workflo.EmptyObject as the type of our step arguments.
Workflo.EmptyObject ensures that if you define the args property of your step
parameters object, you can only use an empty object as its value. If you instead
declared the type of your step arguments to be {}, you would still be able
to define an object with any arbitrary combination of keys and values inside your args property. If you used Object as the type of your step arguments, you could even
set the value of the args property to a string, a number or a boolean because in
JavaScript, the String, Boolean and Number class all extend the base Object class.
Return Type and Return Value of a Step
If the execute function of your Step returns a value, you need to declare
the type of this value as second type parameter of your step parameters object.
You could, for example, return the browser's url after opening a certain page on a website:
"open path %{path} on demo website and return resulting url":
(params: IStepParams<{path: string}, string>) =>
  new Step(params, ({ path }): string => {
    // the baseUrl defined in workflo.conf.ts is prepended automatically when calling `browser.url`
    browser.url(path);

    return browser.getUrl();
  }),
The return value of the execute function will be passed as parameter to the step's callback function. So, when you invoke a step from a testcase, you can use the return value inside
the callback function like this:
when(steps["open path %{path} on demo website and return resulting url"]({
  args: {
    path: 'feed'
  },
  cb: (resultingUrl) => {
    console.log(`You are now located at ${resultingUrl}`);
  }
}));
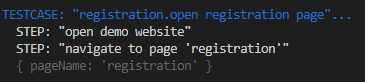
Interpolation of Step Description
If a step has mandatory step arguments, you can display the values of these arguments in the step descriptions shown in test reports by using string interpolation.
The delimiters used for the interpolation are %{}.
So, if a step requires you to pass a pageName as mandatory step argument,
the string %{pageName} in the step's description would be replaced by the actual
value of the pageName property of your step arguments:
.when(steps["navigate to page '%{pageName}'"]({
  args: { pageName: 'registration' }
}));
The step's description displayed in test reports now shows the interpolated value
of pageName:
The Step Class
As was already mentioned, a step definition function takes step parameters and returns
a new instance of the Step class:
"fill in registration form":
(params: IStepParams<{formData: pages.RegistrationFormData}, void>) =>
  new Step(params, ({ formData }): void => {
    pages.registration.form.setValue(formData);
  })
To create an instance of the Step class, we need to pass two parameters to its
constructor:
- The step's parameters object which encapsulate the step's arguments
argsand its callback functioncb - The step's
executefunction used to interact with the tested application
Luckily for us, the step definition function already takes the step's parameters object
params in the exact same form that the constructor of a Step requires. So we
can simply pass along params to the constructor of the Step class.
A step's execute function implements the actual test logic of a Step and its
concept is a key element of the whole wdio-workflo test framework. It is therefore
explained in full detail in the following section of this guide.
The Step.execute Function
Overview
A step's execute function encapsulates commands which modify or read the state of the tested
web application.
Actually, all commands that modify the state of the tested web application
should only ever be invoked in the context of a step's execute function.
Commands reading the state of the GUI may also be invoked from within in a step's callback cb function.
Most of the time, you do not need to explicitly call the Step.execute function because
the given and when functions of a testcase, which take a Step instance as parameter,
automatically invoke this step's execute function when they themselves are run.
Parameters
Every time the execute function is invoked automatically, wdio-workflo passes it
the step's arguments object (args property of the step's params object) as parameter.
The step's arguments object holds key-value pairs which are required by
the execute function to perform interactions with the tested application:
(params: IStepParams<{formData: pages.RegistrationFormData}, void>) =>
  new Step(params, (args): void => {
    pages.registration.form.setValue(args.formData);
  })
To efficiently extract entries from the step's argument object, we can make use of JavaScript's
ES6 object destructuring notation in the parameter list of the execute function:
(params: IStepParams<{formData: pages.RegistrationFormData}, void>) =>
  new Step(params, ({ formData }): void => {
    pages.registration.form.setValue(formData);
  })
Interaction Commands
Usually, the commands which change or read the GUI's state are available as public methods
of a PageNode, like the getText or the click method of the PageElement class.
Page nodes in wdio-workflo are always defined within the scope of a Page class,
so to invoke a public method of a PageNode, we need to access it via its respective page:
new Step(params, (): void => {
  // the "submitButton" PageElement can be accessed via the scope of the "registration" Page
  pages.registration.submitButton.click();
}),
However, there are some "global" commands which cannot be assigned to a PageNode,
like the command to change the URL of the currently active browser window.
Such commands are defined as API functions on webdriverio's browser object, e.g. browser.url():
new Step(params, ({ path }): string => {
  browser.url(path);
}),
Actually, all methods of a PageNode which change or read the state of the
GUI are only abstractions. Internally, they also invoke functions defined on
webdriverio's browser object. Theoretically, you could also write tests in wdio-workflo
without using wdio-workflo's page object family of classes at all and instead
only calling functions defined on the browser object in your steps.
Nested Steps
There is one situation which forces you to invoke a step's execute function manually:
Nested steps.
Usually, the size of a step's execute function is rather small. Many steps only
perform one single interaction with the tested application, e.g. a click on a button.
However, it can be useful to write larger, composite steps which consist of many
smaller steps. Let us call this concept "nested steps".
Imagine, for example, that your tested application requires you to perform a login process at the start of each testcase. A login process might involve filling in some input fields with user credentials, hitting a submit button and waiting for your tested application to finish the authentication process and load a landing page.
You now implement each of these "phases" in a separate step: one for filling in the login form, one for hitting the submit button, one to wait for your application to be in an "authenticated" state.
Instead of invoking each of these steps individually in your testcases,
you could also write a composite step called "login as user %{username}" whose
execute function nests our three fine-grained steps. In this case, you need to invoke
the execute function of each nested step explicitly:
"login as user %{username}":
(params: IStepParams<{username: string, password: string}, void>) =>
  new Step(params, ({ username, password }): void => {
    steps["fill in login form with username %{username} and password %{password}"]({
      args: { username, password }
    }).execute();
    steps["click on submit button in login form"]().execute();
    steps["wait for landing page to be loaded"]().execute();
  })
Step Index File
The step index file at src/steps/index.ts merges all single step definition objects
together into one combined stepDefinitions object.
Every time you create a new step definition object in a .step.ts file, you need to import
it in the step index file and add it to the merged stepDefinitions object:
// IMPORT YOUR STEP DEFINITIONS
import { feedSteps } from './feed.step';
import { registrationSteps } from './registration.step';

// MERGE ALL STEP DEFINITIONS INTO ONE OBJECT
const stepDefinitions = defineSteps({
  ...feedSteps,
  ...registrationSteps
});
The step index file proxies each invocation of a step creation function to add
functionality required by the test framework and it exports the merged steps object:
const steps = proxifySteps(stepDefinitions);

export { steps };
The combined steps object serves as a central repository for all your steps, which
has some decisive advantages:
- You don't need to remember where you defined a certain step
- You can use your code editor's autocompletion to query for a certain step
- You can quickly determine if a step already exists or if it still needs to be implemented
If you like, you can also export smaller step objects from your step index file.
However, if you do so, do not forget to call proxifySteps on your exported step objects:
const steps = proxifySteps(stepDefinitions);

const _feedSteps = proxifySteps(feedSteps);
const _registrationSteps = proxifySteps(registrationSteps);

export {
  steps,
  _feedSteps as feedSteps,
  _registrationSteps as registrationSteps
};
Executing a Step from within a Testcase
To execute a step inside a testcase, you need to pass a Step instance to a given or a when function:
given(steps["open demo website"]())
In the example above, steps["open demo website"] returns a step definition function.
By calling this function with (), we receive an instance of a Step.
When the surrounding given function is invoked, it automatically calls the step's
execute function.
Our "open demo website" step has no mandatory step arguments. Therefore, we can
call its step definition function without passing it a step parameters object.
If a step does have one or more required step arguments or if we want to invoke
a step's callback function, we need to pass a step parameters object to the
step definition function. Inside this object, we can define our step arguments
or step callback function by setting the values of the args and the cb property:
when(steps["filter feed items by term %{term}"]({
  args: { term: 'Cat' },
  cb: () => {
    validate({ "2.1": [2] }, () => {
      const catItem = pages.feed.searchableFeedList.getByTitle('Cat');

      expectElement(catItem).toEventuallyBeVisible();
    });
  }
}))
Querying for a certain Step
One major advantage of writing tests in type-safe languages like TypeScript is that code editors can usually support you very well by providing tools like autocompletion.
We can harness the power of VS Code's intellisense features to solve a problem that regularly occurs during testcase development:
You need to use a step that performs certain interactions with the GUI and you don't know whether the step already exists or whether it still needs to be implemented. If the step already exists, you might not remember its full description.
In this situation, simply type step. into your testcases's code and toggle VS Code's
auto completion feature (automatically or by pressing CTRL + SPACE).
You will be shown a list of all steps defined in your steps object.
You can query for a certain step by typing a term that appears in the description of
your step (e.g. "demo"):

If the step you were looking for is listed, simply click on it or select it with your keyboard's arrow keys and press ENTER.
Steps in Test Reports
Steps in Spec Reports
By default, spec reports do not display steps. However, if you set the value of the consoleLogLevel configuration option in workflo.conf.ts to "steps",
the description of each step and its parameters will be written to the console window
when the execution of the step starts.
Steps in Allure Reports
Wdio-workflo's Allure report displays the sequence of all steps executed during a testcase and also lists the result value and the parameters of each step.
To show the sequence of steps, you need to display a testcase's details view by opening the "Behaviors" page, locating your suite within the "Testcases" group and selecting a testcase:
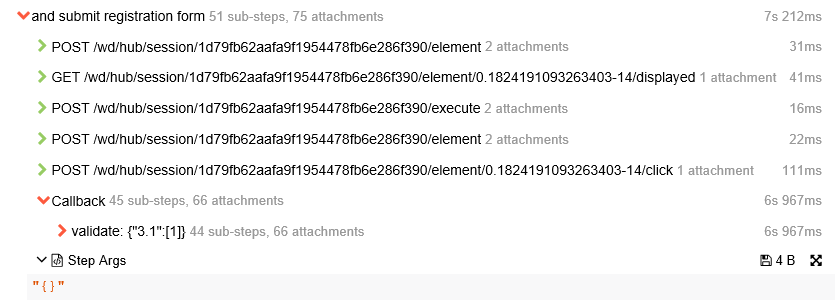
If you click on a step in the details view, all the selenium commands and nested steps which were invoked during the execution of a step will be shown. You will also be able to examine the step's parameters, its duration, return value and its result status, as well as all validation failures that occurred within a step's callback function.