Testcases
Objective and Overview
Wdio-workflo's testcase function describe a sequence of states and state changes
in the GUI of your tested web application. From a user's perspective, testcases define all
interactions between a user and a system that take place in the context of a use case
to achieve a certain goal.
Similar to specs, testcases provide a given function to establish an initial state
and a when function to perform state changes. Unlike the Given and When functions
used within a Story, the given and when functions of a testcase expect a
Step function as parameter instead of a description written in natural language.
The main objective of a testcase is to validate the requirements of your tested application
which you formulated as stories and acceptance criteria in your spec files. To do so,
a testcase can invoke the validate function inside the cb callback function of each
Step to check the correctness of the GUI's state following the execution of a Step.
Related testcase functions are grouped together inside a suite.
Location and Naming Convention
Testcase files are located in the src/testcases folder of your system test directory.
By convention, their filename always ends with .tc.ts.
Example
In the specs guide, we defined some requirements for the registration form of wdio-workflo's demo website.
Let us now write a testcase to validate the correct behavior of our application if a user does not fill in all required form fields and tries to submit an incomplete registration!
In this case, an error message should be displayed which informs the user that, in order for the registration process to succeed, all fields of the registration form need to be filled in.
Let's call our testcase "submit incomplete registration". You can find its implementation
in the file registration.tc.ts located in the folder src/testcases of wdio-workflo-example
repository.
import { pages } from '?/page_objects';
import { steps } from '?/steps';

suite("registration", {}, () => {
  testcase("submit incomplete registration", {}, () => {
    const formData: pages.RegistrationFormData = {
      username: 'johnDoe',
      email: 'john.doe@example.com',
      password: '1234',
    };
    const expectedFeedback = 'Please fill in all fields!';

    given(steps["open demo website"]())
    .and(steps["open page '%{page}'"]({
      args: { page: pages.registration }
    }))
    .when(steps["fill in registration form"]({
      args: { formData }
    }))
    .and(steps["submit registration form"]({
      cb: () => {
        validate({ "3.1": [2] }, () => {
          // server side validation - need to wait for feedback
          expectElement(pages.registration.feedbackField).toEventuallyHaveText(expectedFeedback);
        });
      }
    }));
  });
})
Structure
As you can see from the example above, testcases are usually divided into two sections:
- The declaration and definition of all variables and input or expected data used during testcase execution
- The sequence of chained step invocations and validation callbacks
Syntax
suite
The suite function is used to group multiple related testcases together - e.g. all testcases
that validate the behavior of a website's registration process.
suite("registration", {}, () => { /*your testcases go here*/ })
It has 3 parameters:
- The name of the suite which should be unique across all suites
- The metadata of the suite (reserved for future use - at the moment, this is always an empty object)
- The body function of the suite - you can define all related
testcasefunctions within its scope
testcase
The testcase function lets you define a testcase:
testcase("submit incomplete registration", {}, () => { /*test data and sequence of steps*/ }
It has 3 parameters:
- The name of the testcase which should be unique within a suite
- The metadata of the testcase
- The body function of the testcase used to define test data and sequences of steps
Testcase metadata
You can define the following optional properties for the metadata parameter of a testcase
function:
severity=> How severe the implications of this testcases not passing would bebugs=> If your testcase is affected by bugs which you track on e.g. JIRA, put the bugs' JIRA keys heretestId=> If you manage your testcases in a test management system, put the managed test's key here
given
The given function is used to establish an initial state for your testcase:
given(steps["open demo website"]())
It has 1 parameter:
- A
stepfunction which establishes the initial state of the testcase
Please notice that the entries stored inside the steps object are step definitions
which are not the same as step functions. A step definition actually defines how
a step function should be created. Therefore, you need to execute a step definition
to receive a step function which can be passed to given. This is why we need to put parenthesis after our step definition: steps["open demo website"]().
To create a composite initial state, you can chain multiple given functions together
with the and function:
given(steps["open demo website"]())
.and(steps["open page '%{page}'"]({
  args: { page: pages.registration }
}))
If a step requires you to define step arguments, you can provide them within the args
property of the step function's parameter object. Our step "open page '%{page}'",
for example, requires us to define the page that should be opened.
when
The when function performs state changes in your testcase and represents the
interactions between a user and a system. It always needs to follow a given function
or an and function of a composite initial state:
// chained to a `given` function
given(steps["open demo website"]())
.when(steps["open framework link in footer"]()

// chained to the `and` function of a composite initial state
given(steps["open demo website"]())
.and(steps["open page '%{page}'"]({
  args: { page: pages.registration }
}))
.when(steps["fill in registration form"]({
  args: { formData }
}))
The when function has 1 parameter:
- A
stepfunction which changes the state of your tested application (via its GUI)
Usually, a testcase contains not only one, but many state changes. Therefore,
you can chain multiple when functions together using the and function:
.when(steps["fill in registration form"]({
  args: { formData }
}))
.and(steps["submit registration form"]());
validate
The validate function validates the specs which describe your application's requirements
by checking the correctness of the GUI state following the execution of a step.
It needs to be placed inside the cb callback function of a step:
.and(steps["submit registration form"]({
  cb: () => {
    validate({ "3.1": [2] }, () => {
      expectElement(pages.registration.feedbackField).toEventuallyHaveText(expectedFeedback);
    });
  }
}));
The validate function has 2 parameters:
- The validation object that identifies which specs are to be validated
- The validation body function where you put expectation matchers to compare actual and expected results
The validation object's keys are the IDs of Story functions. Its values are arrays
of acceptance criteria IDs (the first parameters passed to the Then functions of the corresponding Story).
Result Status of validated Acceptance Criteria
You can place one or more expectation matchers inside a validation body function.
The result of each expectation matcher will be evaluated and only if the actual and
the expected value match for each of them, the result status of the acceptance criteria
defined within the validation object will be marked as passed.
If just a single expectation matcher fails (the actual value does not match the expected one),
the result status of the validated acceptance criteria will be marked as failed.
If a runtime error occurs within a validation body function, the result status
of the validated acceptance criteria will always be marked as broken.
If a runtime error occurred somewhere else inside a testcase and before the invocation of the validation body function, the result status of the validated acceptance criteria will be marked as unvalidated.
Expectation Matchers
Overview
Expectation matchers are used to compare an actual value with an expected value. If both values match, the expectation matcher passes. If the two values differ, the expectation matcher fails.
Expectation matchers always consist of two functions: an expect function and a
matcher function whose name usually starts with the word to:
expect(actualUrl).toEqual(expectedUrl)
The expect function is passed the actual value and the matcher function is
passed the expected value.
There is usually also a "reversed" variant available for each expectation matcher
which can be used by inserting a .not between the expect and the to function:
expect(23).not.toBe(41)
Default Expectation Matchers
Wdio-workflo supports all of the expectation matchers provided by the Jasmine test framework and the jasmine-expect matcher library.
The most commonly used default expectation matchers are toBe to compare
the values of booleans or numbers and toEqual to compare the values of strings, arrays and objects. The toContain matcher checks if arrays contain a specific value.
Custom Expectation Matchers
In addition, wdio-workflo also ships with a couple of custom expectation matchers written specifically for page objects. It is recommended to use these custom expectation matchers whenever possible to produce more meaningful validation failure messages.
There are five types of custom expectation matchers provided by wdio-workflo:
expectElementtakes an instance of thePageElementclassexpectListtakes an instance of thePageElementListclassexpectMaptakes an instance of thePageElementMapclassexpectGrouptakes an instance of thePageElementGroupclassexpectPagetakes an instance of thePageclass
The matcher functions of these custom expectation matchers usually come
in two variants:
- One variant checks if a page object's attribute currently matches an expected value
- Another variant checks if a page object's attribute eventually matches an expected value
Both variants follow a naming convention: the "currently" matchers are named toXXX,
the "eventually" matchers are named toEventuallyXXX.
The "eventually" matchers remove the need to put explicit waiting statements before a comparison and can optionally be passed a specific timeout in milliseconds:
expectElement(submitButton).toEventuallyBeVisible({timeout: 2500})
If you do not explicitly specify a timeout value for "eventually" matchers, the page object's default timeout value will be used.
The main advantage of wdio-workflo's custom expectation matchers is that they provide more meaningful failure messages which include:
- the name of the page object
- a description of the kind of comparison which failed
- the XPath selector of a page element
- the timeout used for "eventually" matchers

Testcases in Test Reports
Testcases in Spec Reports
Wdio-workflo's spec report shows the result status of each testcase, grouped by suites.
If you set the value of the consoleLogLevel config option in your workflo.conf.ts file to "testcases", the name of each testcase will be displayed in the console when the testcase starts.
If you set the value of consoleLogLevel to "steps", each step and its parameters will
additionally be written to the console window.
A list of all validation failures and runtime errors will be shown below each suite of testcases.
If you want to display validation failures and runtime errors immediately, set the
value of the reportErrorsInstantly config option to true.
Testcases in Allure Reports
If you want to see more detailed information about your testcases, you need to view their results in wdio-workflo's Allure report.
Open the "Behaviors" page in your Allure report, locate your suite within the "Testcases" group and select a testcase. You will see a sequence of all executed steps on the right side of the page:
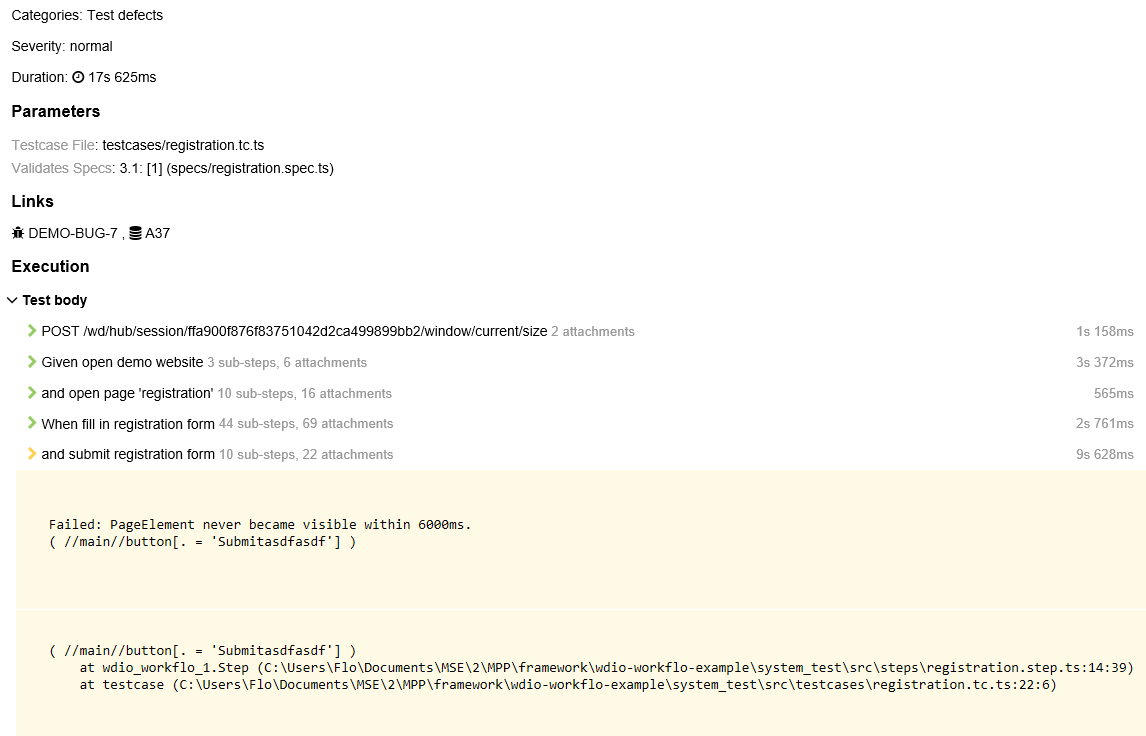
The details view also shows you which specs were validated by your testcase, and, if any errors or validation failures ocurred, it will display error stacktraces and screenshots of the GUI (if you expand the corresponding step) at the time of failure.
Furthermore, the report displays the severity and the duration of the testcase, as well as the testId and the bugs defined in the metadata parameter of the testcase function as clickable links which take you to the corresponding JIRA issue page, for example.